When is the last time you tried turnips? Wait - before you turn up your nose, there's a good reason you might consider trying them again: your taste buds have changed since you started this program. Am I right? I know mine have changed. Enjoying coffee with no sugar and milk instead of cream and eating plain yogurt - I never thought these options were for me, until now. Meaghan, who shared this recipe, encourages us to "broaden our horizons." Plus, one of the key concepts is to vary our foods. Live a little and give this recipe a try. Mashed yellow turnips with crispy shallots might become one of your favorite veggies to enjoy with your steak.
Mashed Yellow Turnips with Crispy Shallots. Photo by Meaghan.

Mashed Yellow Turnips with Crispy Shallots


Ingredients
  • 1 1/2 cups light olive or vegetable oil
  • 3 tablespoons unsalted butter
  • 5 to 6 shallots, peeled and sliced into thin rings
  • 2 large yellow turnips (rutabagas), about 4 pounds total
  • Kosher salt (optional)
  • 1 cup whole milk
  • 6 tablespoons (3/4 stick) salted butter
  • 1/2 teaspoon freshly ground black pepper
Directions
  1. Heat the oil and unsalted butter in a saucepan over medium-low heat until it reaches 220 degrees F. 
  2. Reduce the heat to low, add the shallots, and cook until they are a rich golden brown, 30 to 40 minutes. The temperature should stay below 260 degrees F. 
  3. Stir the shallots occasionally to make sure they brown evenly. 
  4. Remove them from the oil with a slotted spoon, drain well, and spread out to cool on paper towels. Once they have dried and crisped, they can be stored at room temperature, covered, for several days.
  5. Peel the turnips to remove the waxy skins and cut them into generous 1-inch chunks.
  6. Place them in a saucepan with water to cover and 1 teaspoon of salt. 
  7. Bring to a boil and simmer, covered, until easily pierced by a paring knife, about 35 minutes.
  8. Drain the turnips.
  9. In a separate saucepan, heat the milk and salted butter over low heat until the butter has melted and the milk just begins to simmer.
  10. Puree the turnips in several batches in a food processor fitted with the steel blade. 
  11. With the food processor running, add the melted butter and milk in a steady stream. The turnips should be smooth.
  12. Return the puree to the saucepan, season with 1 teaspoon salt and the pepper, and reheat, stirring, over medium heat. 
  13. Serve piping hot, sprinkled generously with crispy shallots. 
Original recipe source: Food Network
These past few weeks, I am hungry all the time. As weird as this sounds, I believe this hunger is because I'm always cold. You see, feeling cold is new to me. When I was a size 30/32, I was never cold. With this kind of hunger happening on a daily basis, I'm asking myself this question: how do I know if I need to push through the hunger or just put on a sweater?
Brrr, I'm cold all the time! Photo by Theresa.
I started to answer this question about a month ago, when cold weather crept in and I started wearing vests and layering my clothes. When I first came to Western Mass, in 1996, a friend told me the best way to survive winter is by wearing vests and layering clothes. That Christmas, she gave me a vest from L.L.Bean, but after trying it on, I exchanged it for something else. It felt too bulky, too warm, and was it not the fashion statement I wanted to make. Layering clothes was something I could not understand, because I was always hot, even in the dead of winter. All that changed this winter, when I began to feel cold even indoors. My friend was right: wearing vests and layering clothes are the best way to survive winters in Western Mass. And guess what? I love wearing vests and layers of clothing!

Hmm, is this a non-scale victory: being cold like normal people? Yes it is!

To help push through my hunger, I did a lot of tapping (mentally pushing thoughts away) and a lot of meal planning. I made more new dishes last week than I have in any month (or two) of the 3 years I've been following this program. I've been mindful to vary my menus. I fed my hunger beast lots of meat and seafood. I cooked foods rich in flavors and spices. I made hearty soups.

This isn't enough, I need to do more. I need to push through this hunger in a way that allows me to drop another size and to reach my goal size. If I want to reach my goal, I must evolve my program, to follow the rules closer than ever before, as if my life depends on it - because it does!

The next step in my evolution is to become more mindful of what I'm eating. Julie teaches us to eat when we're hungry and to stop when we're full. She also teaches us an average portion of protein is about the size of the palm of our hand and to eat veggies bite for bite to our protein. Fat is allowed on this program. We can have mayo and butter. We can even have deep fried foods and blue-cheese dressing. We are asked to be mindful of these concepts when we eat and to remember our goals.

Yes, we can have mayo, butter, fried foods, etc., but we must be mindful of how much fat we're eating, as too much will in fact slow down our weight loss. Too much food will result in weight gain.

The hunger I've felt these past few weeks has made me realize, I have not been mindful enough of my portions or the amount of fat I eat. This changes right this moment.

It's time for me to learn how to listen to my body, to understand the difference between hunger and cold, to be mindful of what I'm eating, and to remember my goal. It's time for me to remember to visualize my goal size.

It's also time to get back to the gym. Exercise isn't about the routine of exercise, it's about giving our bodies a workout so we feel better today, tomorrow, and for years to come.

How about you? Are you ready to push through your hunger? What can you do today to strengthen your resolve to reach your goal size?

This TedTalk video (Sandra Aamodt: Why Dieting Doesn't Usually Work) speaks of mindful eating, and supports much of what Julie teaches. Sandra encourages us to learn to understand our bodies' signals, so that we eat when we're hungry and stop when we're full, and to avoid distractions while we eat, so we can let our body decide when we should be done eating.

Sound familiar?

I found this video inspirational and I hope you do as well.


This is the easiest dish I've made and one of the best scallop recipes. In just 5 steps you have incredibly delicious scallops wrapped in bacon. Yes, yes, I know, one can make this dish themselves, and there is no really good reason not to make this yourself. Except for those days when it's really great to come home and simply pull something from the freezer that is quick to make and satisfies the taste buds. And key-friendly of course. This "recipe" meets all the above criteria.
Scallops with bacon in 5 easy steps and yummy!
Ingredients:

  • 1 box of Yankee Trader frozen scallops (I found these at BigY - they were buy 1 and get one free - this works for me!)
Instructions:

1. Turn oven on to 425.
2.  Open a box of Yankee Trader frozen scallops.
3. Place the frozen scallops on a baking dish and then place in oven.
4. When oven beeps indicating the oven is fully heated, pull the scallops apart.
5. Note the time or set a timer for 10 minutes.
6. Turn the scallops over when it looks appropriate. I turned mine twice.
7. When the bacon is as crispy as you like, pull the dish from the oven.
8. Plate up and enjoy!
I'm on a roll with recipes, as I continue being determined to have a large recipe file for all of us to access when and where we need them. This bread-less sandwich reminds me of the two years I lived in Providence in the early 80's. My friend managed Baby Watson's and they were famous for their wrap-around veggie sandwiches, which they called "strollers." If you could imagine it in a sandwich, they could put it in a "stroller" for you. They spread a special sauce (mayo, soy, and garlic) on the wrap and then added your choice of protein and all veggies you wanted, they rolled everything up, wrapped it in paper, which you peeled off like a banana. You find these everywhere today, but they're called wraps. This recipe is the same concept, minus the (tortilla or pita) wrap, and this recipe is key friendly.
Italian Sub Roll-Up (recipe below)
I make this kind of sandwich on a regular basis. I often add mustard to slices of bologna, olive loaf, turkey, roast beef, or salami, then I roll it up, and wrap it with lettuce or arugula. I never thought to add veggies and herbs inside - great idea!

This type of wrap goes great with a veggie soup, to help keep the ratio of meat to veggie equal. One of these days I'll make the tomato soup my friend made for me when I was in Holland last spring. She used all fresh ingredients and it was divine. I asked her for the recipe and I wrote it all down, but I haven't made it yet. That soup would be a perfect match for this sandwich. Wow, my list of recipes to make is getting longer and longer.

BTW, I used to roll cold cuts with cheese inside, but today I know better than to do this if I want to reach my goal size. Cheese is a condiment and the way I was eating these roll-ups, I was having far too much cheese.

Italian Sub Roll-Up


Ingredients
  • ham slices
  • capicola ham or prosciutto slices
  • salami slices
  • tomato, sliced thin
  • banana peppers
  • spinach or other lettuce
  • dried oregano
  • olive oil
  • mayo & mustard
  • olives (optional)
  • vinegar (optional)
  • cucumbers (optional)
  • onions (optional)
Directions
  1. Use the ham (or the largest cold-cut) for the outside layer.
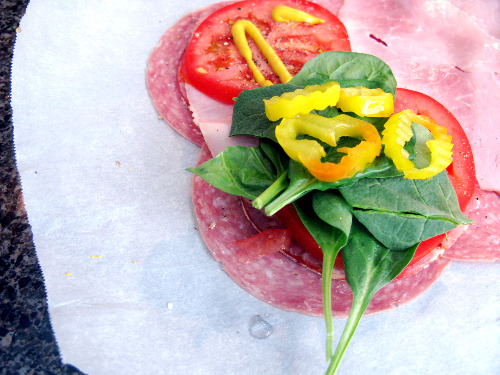
  2. Overlap that cold-cut about 1.5 inches, making 2 rows of 4 (as shown in the image below).
  3. Make sure it’s overlapping, then layer your other meats on top.
  4. Squeeze on the mustard and mayo on one half, as this half will be the middle of your roll.
  5. Layer thinly sliced tomato, banana peppers, and spinach over the mayo/mustard.
  6. Add your other favorite "sub" fillers, such as olives, vinegar, cucumbers, onions, etc.
  7. Roll as tight as you can from the filling side first.
  8. Wrap in parchment or wax paper, like a burrito, and off you go. Peel the parchment paper off as if you're peeling a banana.
The making of an Italian Roll-Up
Original recipe and photo source: Health Bent

Wait - I have one more sandwich recipe ...

Red Bell Pepper Sandwich


Another version of this type of sandwich is the red bell pepper sandwich. Take one look at this photo and it's easy enough to figure out how to make it. It would be delicious to roast the peppers first, although they would be messier to eat. Add sliced turkey or any cold cut, hold the cheese, and add splash of olive and vinegar or mayonnaise, perhaps even a few slices of onion or banana peppers.
Red bell pepper sandwich
 Original recipe and photo source: Primal Parent

 
During my weight loss journey, I've experience many non-scale victories. Sitting in the movie theater one day and suddenly realizing: I can cross my legs. Boarding an airplane and discovering: I no longer need a seatbelt extension. No longer having to arrive early to a meeting so I can quickly scan the room for the largest chair. My latest  non-scale victory discovery: my body temperature is now in line with the average person. The consequence of being average: I'm cold all the time. Being cold is new to me. I was the one who was alway hot - even in the winter. So, what's an average girl to do when temperatures are in the single digits? Add more layers of clothing and then head for the kitchen to make soup.
Photo: Becky Luigart-Stayner
Being average, it turns out, isn't so bad. In fact, it feels great to be average. I consider myself an average size. Hush little mean girl, I know I'm currently the size others started at, it's still average, so hush. I'm an average procrastinator. I'm an average cook with an average desire to learn to cook even better. I've always been average height. Being average works for me.

Now, what about that soup? I have a couple soups I favor, but hands down-my favorite is pumpkin and sausage soup and a pretty close second is my chicken soup. I made chicken soup this week and it was incredible because I added a new secret ingredient: fresh ginger. When I make it next week, I promise to take notes and photos so I can add it to the blog recipes.

Meanwhile, I found this carrot-parsnip soup that looks perfect for those days when the temperature is a mere single-digit. I'll update this page with my own photos when I make this. I'm thinking I'll spice it up and add shrimp. It definitely needs some protein added or on the side. If you make this soup, please share your feedback for the rest of us!

Carrot-Parsnip Soup with Parsnip Chips


Ingredients
  • 2 tablespoons olive oil, divided
  • 2 1/2 cups chopped yellow onion
  • 3 cups coarsely chopped parsnip (about 1 pound)
  • 1/2 cup (1/8-inch-thick) slices parsnip
  • 3 cups water
  • 2 1/2 cups coarsely chopped carrot (about 1 pound)
  • 2 (14-ounce) cans chicken broth 
  • 1/4 teaspoon salt (to me, salt is always optional)
  • 1/4 teaspoon freshly ground black pepper
  • 1 tablespoon chopped fresh chives
Instructions
  1. Heat 1 teaspoon oil in a Dutch oven (or pan) over medium heat. 
  2. Add the onion and cook 10 minutes or until tender, stirring occasionally. 
  3. Add chopped parsnip, water, carrot, and broth; bring to a boil. 
  4. Reduce heat, and simmer 50 minutes or until vegetables are tender. 
  5. Remove from heat; let stand 5 minutes. 
  6. Place half of carrot mixture in a blender; process until smooth. 
  7. Pour pureed carrot mixture in a large bowl.
  8. Repeat procedure with remaining carrot mixture. 
  9. Stir in salt and pepper. 
  10. Heat remaining 5 teaspoons oil in a small saucepan over medium-high heat. 
  11. Add parsnip slices; cook 5 minutes or until lightly browned, turning occasionally. 
  12. Drain on paper towels. 
  13. Sprinkle parsnip chips and chives over soup. 
Note: Stir in more water or broth if you prefer a thinner consistency.
Recipe and photo source: MyRecipes.com


Thank you Lynn for sharing this Jambalaya recipe with us - it looks like a great one to try in this new year!
Jambalaya
Ingredients
  • 1 tablespoon olive oil
  • 1 tablespoon butter
  • 1 large onion, diced
  • 2 andouille sausage, halved lengthwise and cut into 1/4-inch half-moons
  • 6 cloves garlic, finely chopped
  • 1 (14 ounce) can crushed tomatoes
  • 3 green bell peppers, seeded and diced
  • 2 zucchinis, diced
  • 2 tablespoons Cajun seasoning
  • 1 teaspoon hot sauce, or to taste
  • 1 cup chicken broth
  • 1 pound chicken breast, cooked, cooled, and chopped
  • 1 pound cooked, peeled, and deveined shrimp
Directions
  1. Heat olive oil and butter in a large saucepan over medium heat.
  2. Add the onion and andouille sausage and cook and stir until the onion starts to brown, about 10 minutes.
  3. Stir in garlic and cook until fragrant, 1 to 2 minutes.
  4. Mix in crushed tomatoes, green bell peppers, zucchinis, Cajun seasoning, hot sauce, and chicken broth.
  5. Bring mixture to a boil, reduce to a simmer, and cook uncovered until the liquid cooks off and the mixture is thick, about 15 minutes.
  6. Stir in chicken and shrimp and simmer until heated through, 1 to 2 minutes.
Recipe and photo source: Allrecipes.com
Last month I made a delicious new dish for dinner: sirloin beef tips with steamed celeriac. I just ran across the photos I took, so I want to add this recipe here before I forget about it.
Sirloin beef tips with steamed celeriac. Photo by Theresa
Instructions:

Cut the skin off the celeriac, chop the celeriac into cubes, and then cook in a pan of water (like you would potatoes).

While the celeriac cooks, coat the bottom of a pan with olive oil, toss in some fresh minced garlic, then add the beef tips.

After a few minutes of cooking, pull the tips from the pan, slice then into long narrow pieces, and then return them to the pan.

Add a splash of balsamic vinegar and let the tips finish cooking.
Raw celeriac. Photo by Theresa
BTW, did you notice my army guy sitting in the plant next to the cutting board? I have a few others in my kitchen as a reminder of my journey.

Can't remember the army men metaphor? Here is my recollection, which is sort of the middle of the explanation about various military men used as metaphors to explain how food is processed in our bodies...
When you eat something, the Air Force yells - INCOMING and the Army men come running out.
If you eat too many carbs, or fake food, more Army men come out.
When there are too many army men they don't know what to do, so they turn that food into insulin/fat -- you don't want this.
The goal is to feed the marines (with protein) and to keep the army men working hard, but not fooling them into thinking there is more work to do.
This morning, as I sipped my first cup of coffee, I heard this statistic on the news: 92% of people dieting fail. Wow! What a bummer way to start the new year, knowing you have an 8% chance of successfully losing weight. For those of us following Julie's program, we're not worried, because we are an anomaly to this equation. We're not dieting -- we're changing our lifestyles. We're eating in such a way that once we reach our goal size and we'll learn how to stay that size. We'  re not buying into the New Year's resolutions to lose weight this year--we resolve to live healthy lives.
 

Crockpot Pulled Pork 
(recipe below)

I started this weight loss journey at the end of January 2011. In 2011, I did not resolve to lose weight. In 2011, I did not know that in just a few weeks I would begin a journey that would change the way I look and feel about my life. This year, I resolve to have more joy in my life and to share that joy with others.
Of of the ways to bring more joy into my life in 2014 is to explore my creative side. I signed up for a 6 week writing workshop, which starts next week. Another one of my creative goals is to make videos, something I've been talking about doing since 2001.

This morning I made a video! It's short. It's not finished. It's a start!

As I type, crockpot pulled pork is cooking in my kitchen. I took photos as I made the pulled pork and then I made this video. It took more time to make the video than it did to make the dish.

In fact, this makes 2 goals I've already met in the new year:
  1. make videos (check)
  2. make new dishes (check)
2014 is already looking like an incredible year!

What about you? What fun goals do you have for 2014? Is there something you've wanted to do and have put off for years? What non-scale goals are you making happen this year? The year is still young, so if you don't have a plan for 2014, there's no time like the present to make one!

Wishing all of you good health and lots of joy in 2014!

Crockpot Pulled Pork

Ingredients
  • pork shoulder roast, about 4 pounds
  • 2 medium onions, thinly sliced
  • 1 1/2 cups water
  • 1 bottle barbecue sauce (16 ounces)
  • 1 cup chopped onion
 Preparation
  1. Place half of the thinly sliced onions in bottom of slow cooker; add pork and water, along with remaining onion slices. 
  2. Cover and cook on LOW for 8 to 10 hours or 4 to 5 hours on HIGH heat setting. 
  3. Drain liquid from slow cooker; chop the meat coarsely and discard excess fat. 
  4. Put the pork back in the slow cooker. 
  5. Add barbecue sauce and chopped onion. 
  6. Cover and cook on LOW for 4 to 6 hours longer. 
  7. Stir occasionally. 

Recipe source: About.com

01/02/14 Update 7:15am
I finished making this dish and went back and added more photos to the video.